Wednesday 7 December 2011

Madame Claude Meridian Strass

A while ago I got the beauties off ebay. I always admired this style on other ladies but was worried that my slightly wider foot wouldn't fit, but I took the risk. They are actually a half to full size bigger than my usual Louboutin size, so tiny bit longer than I need in order to fit widthwise, they are 38 1/2.
no flash:
with flash:


I bought these with the intention to strass them with Swarovski flat back crystals and Gem Tac glue. As they are not a full pump I thought it would be great starter pair as it hopefully shouldn't take so long and cost so much lol (Swarovski crystals don't come cheap).
I contemplated on ordering from couple of different UK online shops, but then decided that Dreamtime Creations will be the best as they have a great selection of colour and sizes and it's worth paying the extra bit on postage (I think it was 6.75 USD). I initially ordered 5 sizes of crystals: 5ss (10 gross), 9ss (10 gross), 12ss (2 gross), 16ss (2 gross) and 20ss (1 gross). When I got through about 2/3 of the first shoes, I ran out of 12ss, so ordered another 4 gross, hoping this will last the project. I think I will need to order more 5ss and maybe 9ss soon.
This is when I started:


Progress:


With all my other activities I only get a few evenings a week to get on with this project and this definitely is a time consuming project with lot of patience required! So far I have one shoe nearly finished, will update as soon as I manage to get more photos done!

Christmas is coming!

With Christmas only a few weeks away I have decided to get the house decorated a little and get myself into the christmasy mood.
I have made some yummy eggnog, bottle is now sitting in the fridge, probably won't last long:)
Every year I make a Christmas wreath for our door, usually it's very traditional. Every year I tell myself I must do something different but then I steer towards the usual holly with red berries, pine cones, cinnamon sticks and dried orange slices, reds, greens and golds with a big red ribbon.
This year I have decided to do 2 wreaths, one for our big mirror in the hallway and one to hang on the door.
I took some inspiration from googling and got really inspired by these wreaths made with baubles in different colours. So off I went, got a cheap fake fir wreath from the pound shop and about 4 boxes of baubles in different colours and sizes. Then I got some wide cream ribbon, 1/5 meter and dug out some rubber bands.
And this is what I created! (it's hard to get a good photo with all the bling!)


Ideally I guess you would glue the baubles onto the base, which could be polystyrene, but this worked just as well I think!

Next I went for a hunt outside and got some berries in red, orange and yellow, also some fir branches which I used as a base to cover another one of my bargain £1 wreaths, little bigger this time. Then I took a needle and string  and created a strings of red, orange and yellow and tied them around the wreath in a not very regular order:) Added some green ribbon and a big dark plum bow and voila!


I do hope it's cold enough so the berries hold up and last till end of December!

Just found a photo of my last year's Christmas wreath, which was pretty much traditional too, only I chose purple and green colours. Then I decided it looked too plain, so I remembered  I had these rosy red little jingle bells (thanks to the lovely pound shop again) that were a bit scratched and beat up so I covered them in raspberry coloured glitter...it also made for a nice christmasy effect jingling every time the door opened and closed:)


Sunday 23 October 2011

Christian Louboutin Let's Go glitter DIY

This is another glitter DIY that I did a while ago.
Got a pair of Louboutins of ebay, which looked like someone dyed them from light colour to black. That would be OK, but the dye was all over including the beautiful red soles. Literally like someone dipped the shoes in a bucket of black dye!
I only took a couple of crappy iphone pics...but they were greyish black inside out:(
and the soles
So I have searched and searched online and found a company that sell red paint especially for LOuboutins soles. I think I paid something around £7 for teeny tiny pot, but the paint has a really good coverage, so little goes a long way.
This is how the soles looked after I touched them up with the red paint. I couldn't completely cover the scratches, but then again that's not what the paint is for, some red vibram soles would have done the job better I think!

I knew from the start I was in for another glitter madness, so off I went and bought some jet black glitter, in fine and chunky hexagonal. I mixed these two about 50/50. My previous glitter DIY was just using fine glitter, but I felt this time I wanted to try the chunky glitter as it gives a bit more sparkle!
Back with my trusty Gem Tac glue...combined with the glitter...and voila!
My camera was broken at the time, hence the rubbuish Iphone pictures.
Unfortunately I didn't keep these babies as they were half to full size big for me, so I am still on the hunt for a black pair of closed toe pumps in need of some jazzing up:)

Sweet Saturday!

Recently I have been quite obsessed with cupcakes, I love how they come in all different colours and flavours, they just look so pretty! So I thought I have a go.
Unfortunately the little evil child Angus the labrador discovered the cupcake decorsting kit that I had just bought a few weeks ago and had a friendly encounter...well let's say instead of 8 piece set I now have maybe a 30 piece set!Couldn't be bothered to go out to look for another, so I thought I just spoon and knife the frostings onto the cupcakes and it didn't turn out that bad!
I did 2 flavours - chocolate with chocolate frosting and peaches and cream with vanilla frosting (couldn't resist with the purple!)

Sunday 16 October 2011

Loewe handbag DIY

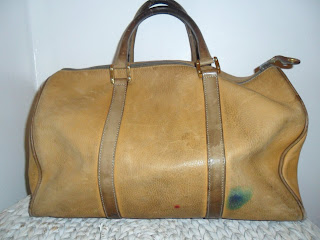
This purse was a car boot sale find. It was totally filthy and beat up, but even through all these marks and dirt it was obvious that it was a great quality made bag and was once very beautiful...the leather was still buttery soft.

Yep! That's a chewing gum stuck tothe bottom!


So I decided that the only way I could save this purse would be if I dye it a darker colour. There was no way I could clean all the ink marks and dirt and get ot the original colour of the leather unless I send it to a professional, maybe somewhere like loving my bags...
I have decided for a purple colour (surprise lol). I had some left over Tarrago dye in no. 54 Aubergine, I ordered another kit in no. 16 Midnight and mixed these two 50/50. First thought I have scrubbed the whole bag with the preparer from the kit (Self-shine colour dye). It has cleaned the the bag up a little and faded some ofthe marks, but most importantly I believe it prepared the leather to absorb the dye better.
I am now nearly at the end of the dying process, with maybe one more coat to be applied, so will update as soon as it's finish with some photos...

Wednesday 12 October 2011

Christian Louboutin Very Prive DIY

I would like to share little DIY that I did a while ago. I found these Christian Louboutin Very Prive Africa shoes on ebay for a steal and while I absolutely love the style, I wasn't all that keen on the colours / pattern. Plus they were rpetty beat up and sad looking with scuffs on the heels and tips and the generally needed a bit of TLC.
 So I got some Tarrago Self Shine Dye Kit in colour Aubergine no. 54. and dyed them a nice purple berry colour. This dye is suitable for leather, artificial leather and canvas (these Loubies are canvas). 

This is after first coat:


Several coats later (it took about 3 - 5 coats depending on area):


In part 2 of this transformation I decided to add some glitter as my main problem were the scuffed heels and tips, which were not covered by the dye. So I ordered a few tiny pots of fine glitter online which was dead cheap and some Gem Tac glue which dries to a waterproof / transparent finish.


Then I started to apply the glitter to the shoes:


And this is the result. It did take some time for the excess glitter to stop falling off, probably about 2 - 3 wears.


They may need re-soling soon as I wear them quite a bit, but the glitter has lasted with no problem maybe 8 months, I would say maybe 20 wears at least. :)
Do you have a similar DIY experience? I want to know all about it!

Tuesday 11 October 2011

Owl ring

On Saturday I went on hunt for some new mugs for the kitchen. Well didn't find any mugs that I actually liked...But found something else! I'm a sucker for unique jewellery, anything that's a little different or maybe even weird. There is a massive New Look store near me where I found this lovely Owl ring (sorry for the crappy Iphone pics):


It was the last piece they had in the store and it was on sale, so I got it for the bargain price of £2:)